Snow days are great because one can leave aside the list of things needing to be done and concentrate all the energy and attention needed to quilt something. Here I've made up a bunch of confetti snowflakes. They are not sewn together... just laid out for a view. As this quilt develops I will add more pics.
It takes a lot of discipline to overcome our sense of regularity, I've learned. Often I want to square off the misshapen corners and 'fix' bad lines almost by instinct. Here I worked at not letting myself come up with something too regular. It is a habit shared by every quilter who has made utility quilts and want nothing to go to waste. For these shapes it does take a bit more fabric, as you'll be trimming away the excess to get an 8 inch square.
These squares were foundation pieced on regular copy paper. Fold over a sheet, and cut off the part at the bottom to square it up. Or to put it another way, cut paper into 8 inch squares and put a stack by your machine, then foundation piece from the middle to the outside. Here I cut odd shaped pieces of fabric that I had hand-dyed, for the middles. Add, framing around the edge and use black as your outermost color sometimes. To give away the ending... I used black sashing to expand the top size and will post it after some more work.
So, having never used copy paper--- or rather so much of it, I was faced with a lazy quilter's dilemma. How do I peel off all of those backings? I tried spritzing with water and peeling with my fingernail, but that was a slow go. So I tossed the whole top in the dryer with some wet heavy towels and that got about half of the backings off. I threw those away, then tried washing in the washer. Hooboy. Don't try that. I ended up with lint galore on the front of all this black sashing and blocks. I'm finishing the top borders now, and will want to put it back in for another try in the washer before I spend a lot of energy batting and backing and quilting something that may always look fuzzified.
Showing posts with label op art. Show all posts
Saturday, February 12, 2011
Thursday, November 11, 2010
Making Flat Trim
Flat Trim is a dressy, crisp 3-D insert that will give your quilt some interest. It looks hard to do but it is easy. See my hand under this striped piece? There is also a flat trip piece on the other side of the turquoise strip which can be lifted up. It is as easy as Prairie Points, only easier. Here's how:
1. Get a length of fabric and square it up by doing this: Snip and rip off the selvedge. Now go to the fold and snip it about an inch from the edge. Rip. This should peel off any bad angles. You can always do it again if you can't rip all the way to the end. Tip: Always rip fast and hard with plenty of Oomph. This will prevent warping the weave.
2. What Size? Whatever size you want your trim to be, double that and add the width of your seam. So, if you want a 2 inch trimpiece, make each strip 4 inches wide plus as wide as the seam will be.
3. Measure, Rip. Measure your distance at the fold. Snip in an inch. Measure your distance at the fold. Snip in an inch. Repeat. I just save the last strip in my 'bone pile' as it may be crooked, yet I have it if I am running shy.
4. Seam Them. Gather up all those strips and sew seam, sew seam, sew seam. I don't even bother to cut the thread each time. I cut all threads after I've sewn the seams. See? That's how they do it in the factories, so they don't spend so much time.
5. Fold and Iron. Or Not. I am not much of an ironer. So, I just foldover the OUTSIDE showing, and zigzag down the whole long snakey trim piece, at the edge. Just like store-bought!
6. Now you're ready to sew your trim to the border. You can either take a minute to actually sew it on before sandwiching the seam, or try to hold it all together. Tip: If you are just sewing some lightweight piees together, skip sewing down the trim as a first step and go straight to the sandwiching. But if you are working with 2 pieces of vastly different weights (ie, a big quilt top you have fabricated already), then sewing the trim as a first step will give you a neater outcome.
Thereya Go! These flat trim pieces are so tailored and smart-looking for a custom artisan look. And they are easy enough to make, that they're great even for a beginner's quilt.
1. Get a length of fabric and square it up by doing this: Snip and rip off the selvedge. Now go to the fold and snip it about an inch from the edge. Rip. This should peel off any bad angles. You can always do it again if you can't rip all the way to the end. Tip: Always rip fast and hard with plenty of Oomph. This will prevent warping the weave.
2. What Size? Whatever size you want your trim to be, double that and add the width of your seam. So, if you want a 2 inch trimpiece, make each strip 4 inches wide plus as wide as the seam will be.
3. Measure, Rip. Measure your distance at the fold. Snip in an inch. Measure your distance at the fold. Snip in an inch. Repeat. I just save the last strip in my 'bone pile' as it may be crooked, yet I have it if I am running shy.
4. Seam Them. Gather up all those strips and sew seam, sew seam, sew seam. I don't even bother to cut the thread each time. I cut all threads after I've sewn the seams. See? That's how they do it in the factories, so they don't spend so much time.
5. Fold and Iron. Or Not. I am not much of an ironer. So, I just foldover the OUTSIDE showing, and zigzag down the whole long snakey trim piece, at the edge. Just like store-bought!
6. Now you're ready to sew your trim to the border. You can either take a minute to actually sew it on before sandwiching the seam, or try to hold it all together. Tip: If you are just sewing some lightweight piees together, skip sewing down the trim as a first step and go straight to the sandwiching. But if you are working with 2 pieces of vastly different weights (ie, a big quilt top you have fabricated already), then sewing the trim as a first step will give you a neater outcome.
Thereya Go! These flat trim pieces are so tailored and smart-looking for a custom artisan look. And they are easy enough to make, that they're great even for a beginner's quilt.
Thursday, May 13, 2010
The Steampunk Desk Accessory
Steampunk Desktop Card & Letter Organizer
I love to find old abandoned wooden things in the thrift stores with good sturdy bones, so I can give new life to something that might otherwise have gone unappreciated. When I found this neat old letter and business card holder, how could I resist punking it all up with femo beads and watch parts, twisted wire and copper edging? This lil sweetie is shown featuring my business card which says on one side, "Make Bad Problems Go Away." (I am an attorney). This desk piece will be available at my Island Retreat etsy store in a few days. If you'd like to visit there, click on one of the pictures under the Island Retreat Widget and you'll be swhisked away to my lil store.
Labels:
art,
art deco,
assemblage,
card holder,
desktop,
Fluffy's Compleat Boutique,
for sale,
letter holder,
op art,
organizer,
steampunk
Monday, April 19, 2010
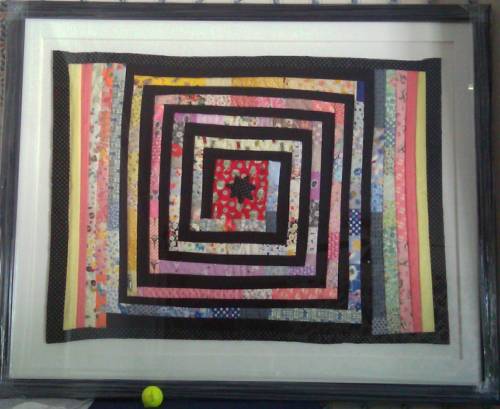
Depression Era Wall Quilt, Framed
This mini was made by stripping reproduction fabrics then turning the "stripes" sideways and making each one into a square... or often a rectangle. Then I used black to pair the postagestamp blocks into one-inch blocks (approximately) and pieced them like a log cabin, only in reverse. The resulting optical effect is a spiral moving from the center, outward, clockwise like the passage of time. In the middle is a Cherokee Star. That's a golf ball at the bottom. It was phtographed behind a golf ball, sort of by accident.
This peice is spoken-for and will be acquired by Cherokee Nation Entertainment. Cherokee Nation passed a law allocating a percentage of each building's construction budget for the purchase of original Cherokee art for the building decor. That's a wonderful law because it keeps artists fed, and keeps the arts communital in vitality. Thanks to Cherokee Nation and CNE for buying this textile art.
Friday, April 2, 2010
Optical Snowball Quilt Top, 1950s
1950s Optical Snowball
See yesterday's bowtie quilt for a similar yet different one. This quilt top was made a decade earlier. See how the colors are different, and have for example, complimentary color wheel colors in the turquoise and chartreuse? (This is one of my fave color combinations). See how the plaids are more "American Western"? If you look at the turquoise and chartreuse "bow ties" in the lower righthand area, you'd see similarities with yesterday's quilt. But look at how the circles are really round. Quilters scream and run away at the thought of piecing round shapes. Think about how round shapes are the opposite curve of the piece they're being attached-to. Like putting in a gathered sleeve, you never quite know if you're on track until you get to the end and check to see if there is fabric overhanging on either side.
I adore this quilt. Why? Because the use of the black checkered gingham fabric makes me crazy! Big round postholes are like a textural collage on the surface. And in other places, the pattern drops mistily and indistinctly into the background. Now look at the block below the red square. Its like spaghetti or wheels in motion. You can tell that the woman who made this quilt was not over-intellectualizing the process. She just put things together any which way. We could speculate that a quilt like this was made by a woman who learned her skills in the depression era, when it didn't really matter what the right way was... a seamstress just did whatever conserved the most fabric and minimized the most waste. It was Lllooonnnnggg before the days of fussy-cutting quilt fabrics.
This quilt is small twin or personal quilt size. It is a top only. It would be for sale for $75 as a top, or $250 quilted and backed in the colors of the buyer's choice. It could be edged out with a border of historically-accurate fabric to make a full, king, queen quilt for $450. It is hand-sewn.
Thursday, April 1, 2010
1960s Bowtie Quilt Panel
Don't you just love those pop art quilts using stark contrast to trick your eyes into seeing different parts of a quilt? This one was probably made in the 1960s, if my take on the fabrics is accurate. It contains bowties made up of a four-square with a diamond block in the middle of it. I don't know who made it. Its a partial quilt top, about four feet by 3 feet in size.
Now, look again. Focus on the roundish square made between the two green bowties near the bottom and middle. See how that "square" is actually eight-sided? Sometimes ladies make a SNOWBALL quilt using this same pattern, by accentuating the round part and then fading out the surrounding pieces in a monotone of background.
This piece is so very informal that I keep looking at it from different angles like my eyes are playing tricks. The bowtie is green. Now it is pink. That plaid middle is no help in giving context. Women with no art training (or quilt training for that matter) just exhuberantly made things up as they went along, and the result is wacky quilts for fun.
Subscribe to:
Posts (Atom)