Snow days are great because one can leave aside the list of things needing to be done and concentrate all the energy and attention needed to quilt something. Here I've made up a bunch of confetti snowflakes. They are not sewn together... just laid out for a view. As this quilt develops I will add more pics.
It takes a lot of discipline to overcome our sense of regularity, I've learned. Often I want to square off the misshapen corners and 'fix' bad lines almost by instinct. Here I worked at not letting myself come up with something too regular. It is a habit shared by every quilter who has made utility quilts and want nothing to go to waste. For these shapes it does take a bit more fabric, as you'll be trimming away the excess to get an 8 inch square.
These squares were foundation pieced on regular copy paper. Fold over a sheet, and cut off the part at the bottom to square it up. Or to put it another way, cut paper into 8 inch squares and put a stack by your machine, then foundation piece from the middle to the outside. Here I cut odd shaped pieces of fabric that I had hand-dyed, for the middles. Add, framing around the edge and use black as your outermost color sometimes. To give away the ending... I used black sashing to expand the top size and will post it after some more work.
So, having never used copy paper--- or rather so much of it, I was faced with a lazy quilter's dilemma. How do I peel off all of those backings? I tried spritzing with water and peeling with my fingernail, but that was a slow go. So I tossed the whole top in the dryer with some wet heavy towels and that got about half of the backings off. I threw those away, then tried washing in the washer. Hooboy. Don't try that. I ended up with lint galore on the front of all this black sashing and blocks. I'm finishing the top borders now, and will want to put it back in for another try in the washer before I spend a lot of energy batting and backing and quilting something that may always look fuzzified.
Showing posts with label quilting. Show all posts
Saturday, February 12, 2011
Friday, February 11, 2011
A series of fun potholders
Recently, I made up a bunch of fun, funky potholders to list on Island Retreat, my etsy site. You can see the whole collection if you click on the Island Retreat Etsy thumbnails on the sidebar. They're just joyous little mindless artsy pieces with insulbrite sewn between the layers or foundation-pieced on insulbrite, for kitchen chores. I use them to take cookies out of the oven, or as a drip pad in front of the coffeepot, because you can toss them in the washer and have a fresh one every day. This one has pyramids made from prairie points, and Oklahoma in the sky. Check an earlier blog if you would like to learn how to make prairie points. They are easy and fun.
Thursday, February 10, 2011
Informal Velvet Quilt Piece
Who knows where I got this raggedy piece of velvet quilt. I only remember that it was sort of grimey and I wondered if I could restore it to usefulness. I took the risk of throwing it into the washer and the back shredded into threads, so I ripped that off, and along with it came the thin edge on one side. When it was fresh and clean, I just stored it for years. Today, its is unlikely to find this sort of cotton velvet which is heavy but not backed with an upholstery texture. Most velvets have some synthetic content now. I'd guess it is from 1970 or before-- back then the synthetics were not as likely to be blended and not as likely to be nylon.
See how the triangles were constructed? Peach and gold were sewn together on one side, and then a line was sewn linking together two such squares. That way, no one had to actually turn that sharp corner and try to line up the pieces. For a long time, I was scared of triangles because of the problem of making points, until I discovered that. (Now, I'm just scared of making triangles because I warp things when I sew on the bias.)
So I am guessing that originally, this had 6 triangle panels, and then it was bordered with various colored velvet scraps of odd lengths. The common factor is that all the velvet scraps were cut at, ie about 6 inch widths.
Its just a nice old piece of a velvet quilt, waiting to some day be batted and backed as a shabby Anthropology-style throw. Then perhaps, I'd eventually come along and embroider it lavishly as I sit beneath it on cold winter nights.
See how the triangles were constructed? Peach and gold were sewn together on one side, and then a line was sewn linking together two such squares. That way, no one had to actually turn that sharp corner and try to line up the pieces. For a long time, I was scared of triangles because of the problem of making points, until I discovered that. (Now, I'm just scared of making triangles because I warp things when I sew on the bias.
So I am guessing that originally, this had 6 triangle panels, and then it was bordered with various colored velvet scraps of odd lengths. The common factor is that all the velvet scraps were cut at, ie about 6 inch widths.
Its just a nice old piece of a velvet quilt, waiting to some day be batted and backed as a shabby Anthropology-style throw. Then perhaps, I'd eventually come along and embroider it lavishly as I sit beneath it on cold winter nights.
Friday, December 24, 2010
Tibbits Blue TieDye Quilt
Here's a joyous riot of colors in this quilt made for my husband's father and step-mother. It features a lot of fabrics from Keepin U N Stitches at Jay, Oklahoma and the centerpiece is one of my hand-dyed Kona panels. I machine-stitched the strip pieces and applied custom machine quilting, including a few mysterious words in the stitching.... such as the fact that it was quilted on Solstice 2010. If you are in this geographical area, rent the longarm machine at the quilt and fabric shop above, for about $10 an hour to do your very own machine quilting--- you can buy back and bat there, and run your backing seam. Then Keepin U N Stitches will provide you with thread from their choice or you can bring your own tread and bobbins if you have something particularly unusual in mind.
Sunday, December 12, 2010
Quilter's Sunset
Working on getting a bunch of memory quilts ready to give for Christmas from my father and I, I've been keeping the trail beat down between Stilwell, Oklahoma and a quilt shop in Jay, Oklahoma. It is about 58 miles one-way to go up there and spend a day working on a rented long-arm quilting machine. Despite the drive, it has been worth the trouble. I have saved my father a few dollars that we'd be paying out for a machine quilter's time. I have been able to personalize the quilts by freehanding some dates and other secret messages into the quilting thread patterns, and... I was privileged to catch this gorgeous sunset on camera. While driving. I took a series of pics, as the sunset changed from moment to moment. Here I just hit it with one lil edit fature.... blacking out some headlights at the bottom. All of the sky colors are au naturale.
Thursday, November 25, 2010
Imaginarium, a Scrap Baby Quilt
Imaginarium, a charm quilt for baby
This is a baby quilt, made from leftovers from a quilt which I am making for myself. It is a little fancier than most charm quilts. Charm quilts are named for their 'charm' because they are made from scraps which sometimes do and sometimes do not blend well. Charm quilts tend to be more funky and campy than their sister-quilts-- matched piece quilts. A unique feature of this quilt is that it has some of the prairie points and flat trim from the big quilt, and it adds interest and detail.
There are some jokes or funny parts to this quilt that will make you laugh if you're a quilter. I'll let ya in on the secret. A beginner quilter might make borders such as the stripe and print here, and might attach one edge backward or going to same direction as the other side as I have done. Experienced quilters would never do that because it violates the rules of symmetry. However, Fluffy I am and Fluffy I do, so here the borders on both sides are going in the same direction. It was a conscious choice.
Another quilter's joke is that in places you'll find prairie points or flat trim, and not in other places that one would expect to see the same thing. So happens that I made up some extra length of these and attached them to sashing, only to destine them to the cutting-room floor.
Here I have followed the old legal maxim of equity, known to law students throughout time from Black's Law Dictionary (or Prosser on Torts) "You take your victim as you find him." In law, it means that a tort defendant is liable for the outcome even if a tort Plaintiff or victim is extraordinarily impacted. If you trip a waiter with brittle bones simply in revenge because of poor service, you must pay the price of the damage you do, even if an average waiter would not suffer greatly from being tripped. Likewise, I've 'taken my victim as I found him' in my scrap pile. Some strips with Prairie Points don't have a full row. Well, tough cookies. My goal was to quilt up that mess in the floor. The result is that you have a few unexpected things happening on this quilt.
This juvenile quilt top is for sale as a top ($100) or fully custom machine quilted, batted and backed with the contrast or match fabric of your choice ($300).
Wednesday, November 24, 2010
The Talking Potholder
"Ouch, This is hot!" said the talking potholder, when she used it to take nice cinnamon bread out of the oven, so it could be drizzled with orange glaze and a handful of chopped almonds. But really, the Talking Potholder didn't mind too very much, because after all, being a potholder was the only life it had ever known.
Tuesday, November 23, 2010
Stripey Potholder with Pink
Stripey Potholder with Pink Thingy
Potholder of the Day Club here, delivering your Potholder Eye Candy for Tuesday November 23rd. For a week now, I've been featuring my hand-dyed funky potholders. These are little utilitarian jewels of art, ready to take a center stage in your kitchen. Or, if you kitchen doesn't have a stage in it, then I guess you could hang one of these on the Spoon Drawer Handle.
Monday, November 22, 2010
One-eyed Panther Butterfly Lemon Berry Potholder
I guess this potholder sorta looked like a face, so I added an eye. The berry-colored fuschia is hand-dyed fabric, and the whole shebang is lined with not only nice cotton but alsy a heat resistant barrier. You cannot tell it, but it is oversized for easy cookie retrieval. A potholder in the series called: Potholder Series.
Sunday, November 21, 2010
The Potholder Series: Moccasin Nose
The silliest potholder you've ever seen is this "Moccasin Nose" potholder, made of hand-dyed fabric (by me) and then sillied-up with a reproduction Depression-Era flour sack print. So atypical that Google will have a hard time figuring out what advertisements to put on the page with depression-era moccasins, noses and hand dyed fabrics. The Potholder Series continues, so stay tuned for tomorrow's mystery.
Saturday, November 20, 2010
Color Burst Paris, a Funky Potholder
Today's wee little piece of fun artisan potholder is called Color Burst Paris. Or, if you wish, Colorburst Paris. The Paris print at lower left is a reproduction fabric from the Drepression Era. And that gorgeous piece of color in the middle is one of my hand-dyed pieces. These are for sale at my Etsy store, so stock up in time for The Cooking Season.
Thursday, November 18, 2010
Blue Pool Potholder
Today's delicious lil artsy potholder looks like a black and white striped air mattress on a cool pool. Visit my Etsy store: Island Retreat to see more.
Wednesday, November 17, 2010
Tuesday, November 16, 2010
The Potholder Series
Someone has asked to see my potholders. Many are online at my etsy shop. For the next few days, the daily blog will be simply Potholder of the Day.
Monday, November 15, 2010
Steam Punk Quilt Top
Today's post is a fun quilt top that I made in late October. I found steam punk image fabric and designed the remainder of the quilt around these nice pieces with themes of time and travel.
I was attending the Governor's Water Conference and took my sewing machine, so I would have something to do in the evenings. When I travel without Dennis I miss him, so quilting is something I can do while I am alone.
This fun quilt is just a top thus far, and can be made up with any solid or print backing in Standard, Queen or King for $400.00 complete. It can be custom quilted with names, initials, secret messages and the like, in any color(s) of thread.
Friday, November 12, 2010
Kai's Fuzzy Quilt
Here on his daddy's Ju Jitsu mat, is a fuzzy soft quilt made for Kai Brinkley. The fake fur looks wrinkled, but its actually colored and napped like that. This was a joyous fun campy utility quilt, made in the spirit of grandmothers of days gone by, who would piece together warm flannel scraps with no particular pattern. This one, I've seamed on the outside. After washing, these seams will fuzz up and add a bit of loft to the quilt. Then if it is laid on Baby Kai with the cozy flannel side down, it will give a little bit more room for an air layer. It is larger than crib size, smaller than a sofa throw, and designed for playing on the floor or snuggling at night.
Note: Shopping for fabric I noted that 3 of the most popular main chain stores are selling novelty prints with childrens' themes in fabrics that say "Not suitable for sleepwear." You may have to look on the bolt end, the selvedge or inside the flat card to find the warning. Don't use such flannels for quilts because they are flammable, even if these stores seem to theme the flannels for childrens' bedwear and bedding. In my opinion, these should be removed from the shelves or the warning should be prominently displayed.
Labels:
fine living,
quilt top,
quilting,
Quilts,
strip quilt
Thursday, November 11, 2010
Making Flat Trim
Flat Trim is a dressy, crisp 3-D insert that will give your quilt some interest. It looks hard to do but it is easy. See my hand under this striped piece? There is also a flat trip piece on the other side of the turquoise strip which can be lifted up. It is as easy as Prairie Points, only easier. Here's how:
1. Get a length of fabric and square it up by doing this: Snip and rip off the selvedge. Now go to the fold and snip it about an inch from the edge. Rip. This should peel off any bad angles. You can always do it again if you can't rip all the way to the end. Tip: Always rip fast and hard with plenty of Oomph. This will prevent warping the weave.
2. What Size? Whatever size you want your trim to be, double that and add the width of your seam. So, if you want a 2 inch trimpiece, make each strip 4 inches wide plus as wide as the seam will be.
3. Measure, Rip. Measure your distance at the fold. Snip in an inch. Measure your distance at the fold. Snip in an inch. Repeat. I just save the last strip in my 'bone pile' as it may be crooked, yet I have it if I am running shy.
4. Seam Them. Gather up all those strips and sew seam, sew seam, sew seam. I don't even bother to cut the thread each time. I cut all threads after I've sewn the seams. See? That's how they do it in the factories, so they don't spend so much time.
5. Fold and Iron. Or Not. I am not much of an ironer. So, I just foldover the OUTSIDE showing, and zigzag down the whole long snakey trim piece, at the edge. Just like store-bought!
6. Now you're ready to sew your trim to the border. You can either take a minute to actually sew it on before sandwiching the seam, or try to hold it all together. Tip: If you are just sewing some lightweight piees together, skip sewing down the trim as a first step and go straight to the sandwiching. But if you are working with 2 pieces of vastly different weights (ie, a big quilt top you have fabricated already), then sewing the trim as a first step will give you a neater outcome.
Thereya Go! These flat trim pieces are so tailored and smart-looking for a custom artisan look. And they are easy enough to make, that they're great even for a beginner's quilt.
1. Get a length of fabric and square it up by doing this: Snip and rip off the selvedge. Now go to the fold and snip it about an inch from the edge. Rip. This should peel off any bad angles. You can always do it again if you can't rip all the way to the end. Tip: Always rip fast and hard with plenty of Oomph. This will prevent warping the weave.
2. What Size? Whatever size you want your trim to be, double that and add the width of your seam. So, if you want a 2 inch trimpiece, make each strip 4 inches wide plus as wide as the seam will be.
3. Measure, Rip. Measure your distance at the fold. Snip in an inch. Measure your distance at the fold. Snip in an inch. Repeat. I just save the last strip in my 'bone pile' as it may be crooked, yet I have it if I am running shy.
4. Seam Them. Gather up all those strips and sew seam, sew seam, sew seam. I don't even bother to cut the thread each time. I cut all threads after I've sewn the seams. See? That's how they do it in the factories, so they don't spend so much time.
5. Fold and Iron. Or Not. I am not much of an ironer. So, I just foldover the OUTSIDE showing, and zigzag down the whole long snakey trim piece, at the edge. Just like store-bought!
6. Now you're ready to sew your trim to the border. You can either take a minute to actually sew it on before sandwiching the seam, or try to hold it all together. Tip: If you are just sewing some lightweight piees together, skip sewing down the trim as a first step and go straight to the sandwiching. But if you are working with 2 pieces of vastly different weights (ie, a big quilt top you have fabricated already), then sewing the trim as a first step will give you a neater outcome.
Thereya Go! These flat trim pieces are so tailored and smart-looking for a custom artisan look. And they are easy enough to make, that they're great even for a beginner's quilt.
Wednesday, November 10, 2010
How To Make Prairie Points
Prairie Points are these showy little triangles peeping out of the seam on a quilt. You'll find them most often along the edges of quilts. Unliked scalloped edges, these are easy to make. Here's how:
Select your fabric. A dramatic contrast or stark stripes might give your project some punch. If you choose something that 'matches' too closely, your prairie points may seem like a lot of work for very little visual impact. (Here, I've used birch tree trunks, with batiks and a festive print.) You can buy and yard and go back if you need more.
Snip and rip off the selvedge piece with the fabric's name on it. Now rip a straight line... You do this by finding the fold of the fabric, and snipping about an inch in from the edge. You will rip it from the middle to the edges in both directions at once. Now you have a true straight line.
Cut Strips... Using a tape measure or the ruler on a cutting board, snip in about an inch on the fold, every 4 inches. When you get to the last one, it might not be square if the fabric was not cut precisely, so I always throw the last piece into the 'bone pile' in my sewing room floor. You will have it there if you need it, and if not you may use it later for potholders or pillowcases.
Make the Strips Square... Lay your strip longwise and make a snip every four inches, then rip each into a 4 inch square. Tip: If you are precise, lay 2 or 3 strips atop each other and cut multiples all the way thru instead of ripping.
Stack and Fold... Stack them up on your ironing board. Get one. Fold into a triangle. Fold into a triangle again. Iron. Stack 'em in a finished pile. Repeat till all are done. Tip: If you use a stripe, you *might* prefer to fold them with the fold going the same direction. If you're making horizontals and you get a vertical, turn it over. Its magic!
Zigzag them Down... Sew these down onto your sashing or border strip using a zigzag stitch. You'll hide that when you sew the quilt top seam.
Finish and Admire... Now lay your border strip under the quilt top. Eleanor Burns, author of Quilt In A Day Series, gives this tip and it makes your project move more smoothly in the machine. Quilt your regular size of seam.
I love these! This is my first quilt with Prairie Points and they're so easy plus fancy. When you quilt your top, you may wish to seam along whichever side you wish in order to lay them up toward the top of the bed, or down toward the edge of the quilt.
Tuesday, November 9, 2010
Tuscan Memories
Here's a sassy bright big quilt top that I made to match those new plaster and glaze terra cotta walls. And its easy. Pick out 9 pieces of fabric that pick up the colors in your room.
Tip: Shop some place like a quilt fabric store, so you'll get square cuts. Often the bargain and discount stores are rushed or don't have employees trained to cut fabric on a square 90-degree angle. Why does that matter? You'll want to rip some strips, and you will lose the use of a lot more than just an inch if the cut is off.
Get a half-yard of fabric from each bolt, and get thread.
At home, snip the selvedge and strip that off of each piece. Now go in about an inch from the edge of fabric, and snip it at the fold so you can rip right down the edge to give yourself a true and straight ripline. Measure four inches in, and snip/rip again. Measure four inches and snip/rip again. Do this till the last one... it might not be square. Start yourself a "bone pile" in the corner of the floor in case you do need part or all of it later.
Repeat this step for all 9. You'll end up with a bunch of piles of strips, so sit down at the machine and randomly seam them together, about as long (or about as wide) as you want your middle "bricks" to be.
Do you want bricks going across? Or down? Choose your direction and start sewing the strips together. You'll end up with a rectangle about the size of the middle 'brickey' part of this quilt. If your edges are not square, trim those neat.
Now go back to the store. Pick 4 contrasty colors. I got 3 yards, 2 yards, 1 yard and 1 yard, but that's too much. Why did do that? Because 3 yards is longer than any quilt stirp and saves me from having to seam the longest pieces. Call it lazy. Or call it 'adding to my stash of fabric.' You never know when you'll want to make matching pillow cases.
There are 2 tricky advanced techniques on this otherwise super quick and supersimple quilt....
1. Prairie Points
2. Flat Folded Trim
You can skip these if it is your first quilt, or read tomorrow's blog for more "how to."
Have I given you enough basics to set yourself free to just start sewing pieces together till its big and beautiful? That is how I quilt... with little regard for standard sizing. I want a quilt big enough to cover the edges when we are snuggled in on a cold winter day. I want a quilt that is not so very long that its weight would pull or work its way to the foot of the bed if we're underneath it.
These are basic instructions for a quilt top in a day or two. More later on the details, such as batting, backing, binding, etc.
Monday, April 19, 2010
Depression Era Wall Quilt, Framed
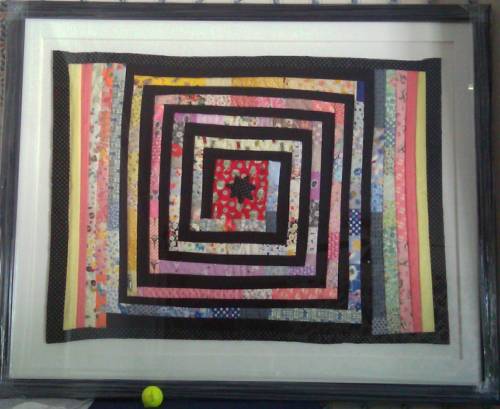
This mini was made by stripping reproduction fabrics then turning the "stripes" sideways and making each one into a square... or often a rectangle. Then I used black to pair the postagestamp blocks into one-inch blocks (approximately) and pieced them like a log cabin, only in reverse. The resulting optical effect is a spiral moving from the center, outward, clockwise like the passage of time. In the middle is a Cherokee Star. That's a golf ball at the bottom. It was phtographed behind a golf ball, sort of by accident.
This peice is spoken-for and will be acquired by Cherokee Nation Entertainment. Cherokee Nation passed a law allocating a percentage of each building's construction budget for the purchase of original Cherokee art for the building decor. That's a wonderful law because it keeps artists fed, and keeps the arts communital in vitality. Thanks to Cherokee Nation and CNE for buying this textile art.
Subscribe to:
Posts (Atom)